GPS Navigation

GPS Suitability & Accuracy
GPS navigation is very well suited for bushwalking in the Perth region of Western Australia. Due to the relatively light or open eucalypt forest conditions and mainly gentle terrain in this region the GPS unit is able to maintain good satellite coverage and tracking in almost all areas, with the result that good navigation accuracy should be achieved.  Location accuracy is typically 5-10m.

Modern GPS units can generally maintain accurate position fixes even under denser tree canopy. Misleading readings should be rare, as can be verified by directly comparing downloads of GPS  ‘tracks’ recorded while walking with the intended route or actual physical tracks. Misleading readings could occur however on steep hillsides (due to signal reflections) and reduced accuracy will occur if less than 4 satellites are in view of the receiver or if they are all in line or in a tight grouping. But those situations are unusual. The receiver can indicate if the signal is weak and navigation accuracy is poor. Clouds and weather conditions do NOT significantly affect accuracy.

Compass?
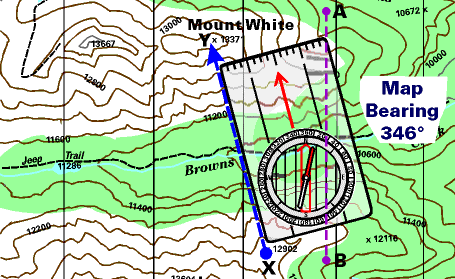
If you prefer to use a magnetic compass to maintain your direction between waypoints, you can obtain from the GPS data display the bearing from your current location to the destination waypoint. Transfer this bearing to your compass and then use the compass to establish your walking direction in the traditional way. One advantage of using a compass routinely between waypoints is that it will save on batteries which could be a key consideration on longer walks. A disadvantage is that using the compass encourages less interesting ‘straight-line’ walking between waypoints and detracts from the great flexibility and advantage that the GPS offers to vary the route away from a straight line and still find the destination.

Creating your own GPS walks

If you have one of the GPS mapping software packages  you will be able to quickly create your own walk routes and maps in six or seven simple steps as follows (OR in place of Step 1 & possibly Step 2 you can use map images already available for the region on USB or your software may be able to access GoogleEarth or Google Maps):
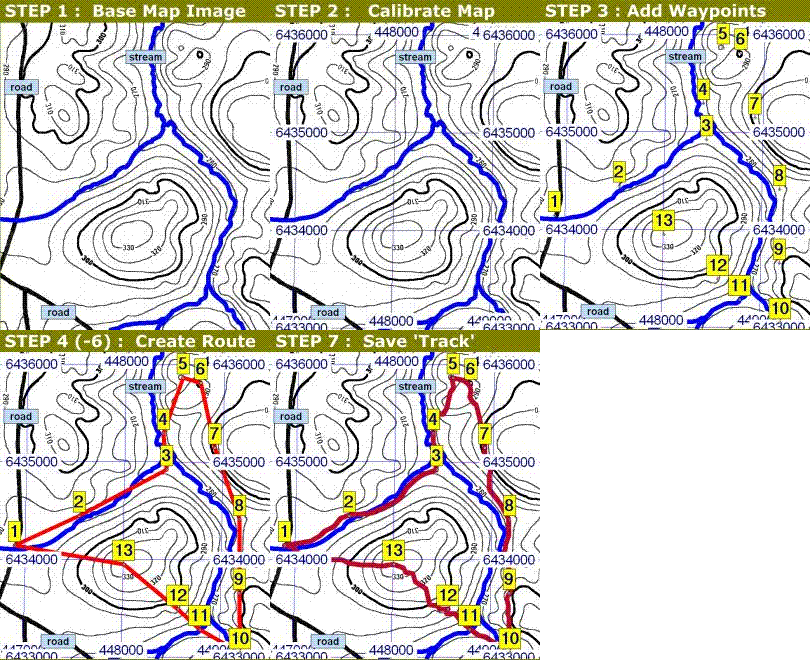
   1. Create a Map Image file (e.g. .bmp, .jpg, .png) by scanning the portion of an existing map which covers the area of your planned walk.

   2. Calibrate the Map Image to the known Grid Coordinates using GPS mapping software (e.g. OziExplorer, GARtrip, GPSUtility). Ensure you set the correct Map Datum and Projection.

   3. Set Waypoints on the Calibrated Map at locations you may wish to include on your chosen Route. This creates a Waypoint Listing. Alternatively, you can import waypoints from existing listings such as provided on WalkGPS. See WalkGPS Maps, Waypoints & Tracks page which includes downloadable GPX files of waypoints and ‘tracks’ for all walks, plus notes on how to import into mapping software such as OziExplorer (or to upload to your GPS unit).

   4. Create an intended Route by selecting Waypoints from the Listing in a suitable sequence for your walk (or alternatively create an intended ‘track’ by choosing a sequence of track points).

   5. Print off a hard copy of your Calibrated Map showing the Waypoint locations and your planned Route or ‘track’.  (See separate note below on the potential for uploading of custom map information to your GPS unit.)

   6. Upload (transfer) the Waypoints and Route (or specific track) to your GPS unit from your PC. Don’t attempt the very slow and error-prone chore of manually inputting Waypoints into your GPS.

   7. Save your walked ‘Track’ –  When you are on your walk you will no doubt at times decide to vary your path from the planned Route. For that reason it is very useful while walking to record and save your actual ‘Track’ in your GPS. Download it into your PC after your walk to compare with your original planned Route and make any changes that you might prefer if you plan to walk in the area again.

For WalkGPS subscribers only: For tips on how to create GPS walk files without needing to buy software, subscribers are welcome to contact WalkGPS to receive a free copy of “How to create your own GPS walk files”.

A few other tips / FAQs

For WalkGPS subscribers only: Aside from the tips below, subscribers are welcome to contact WalkGPS to receive a free copy of “Starter Notes for GPS Beginners”.

  • Buying your first GPS unit

    The main brands of hand-held receivers offer a large number of models with prices ranging from around A$230 for a basic or entry-level unit such as a Garmin eTrex SE to over A$1000 for units with greater loadable memory size, built-in map databases and larger screens. Be wary of over-investing in capability and features that you may not need or use. The entry-level units are excellent value for money and are quite adequate for most bushwalking purposes. They are also generally smaller, lighter and simplest to use, and generally give longer battery life. The more expensive hand-held units usually include map databases, but most walkers will still want to carry good paper topo. maps due to the small screen size of the units and the limitations of some of the available databases. Ironically, entry level units may have better outdoor legibility than some more upmarket units with touch-screens.

    NOTE: This site, WalkGPS, is non-sponsored and is not an agent or retailer for any brands of GPS units.

  • Handheld or Smartphone?

    Smartphones are increasingly being used in place of stand-alone GPS units. Using your smartphone and a suitable app is cheaper than buying a new handheld GPS. In terms of durability and battery life a smartphone cannot yet fully compete with a quality handheld GPS unit, especially for longer walks in a range of bushwalking conditions, but for shorter day walks can be quite adequate.

    A few tips if using a smartphone for navigation
    • Download offline maps before leaving home, or use a map database stored on your phone – Reliance on network connection for accessing online maps such as Google Maps during your walk will result in rapid draining of the battery and lack of access to maps of the phone is outside of network coverage.
    • Turn on airplane mode – Battery life of most current model iOS and Android smartphones can be greatly extended by switching the phone to ‘airplane mode’ which disables the Wi-Fi, cellular, and Bluetooth functions but doesn’t disable GPS. In airplane mode a phone that usually struggles to stay charged all day may stay charged for days.
    • Carry a portable charger/power bank
    • Consider a phone harness or chest mount – to provide hands-free access and to protect your phone from weather and impacts.
  • Using custom maps

    Garmin Custom Maps are available on this site for WalkGPS walk areas – These have been produced via a simple process involving: 1) georeferencing of each WalkGPS walk map image file in GoogleEarth, then 2) uploading the saved .kmz file to a Garmin handheld units and/or importing the file to Garmin BaseCamp freeware for walk planning or review.

    Custom Maps for Avenza Maps users – WalkGPS walk area maps are also available from the Avenza Maps store for users of the Avenza Maps smartphone app.

    Note: Map image files cannot be directly uploaded to your GPS unit. The images need to be georeferenced (through the Garmin Customs Map process or similar) to be able to display the map. OziExplorer GPS mapping software can upload waypoints, routes and tracks, but not maps, to a handheld GPS receiver.

    Other map sources – Many GPS receivers suitable for bushwalking do have the capability to import digital topographic map data for offline use. (These are ‘vector’ maps as distinct from scanned ‘raster’ image files). Australia-wide vector contour map coverage includes: “OZtopo”,  Garmin’s “GPS TopoPLUS Australia 5m”  and Magellan’s “Summit Series AUS –Western Australia”Also see maps suitable for GPS receivers on WalkGPS.

  • Using Google Earth

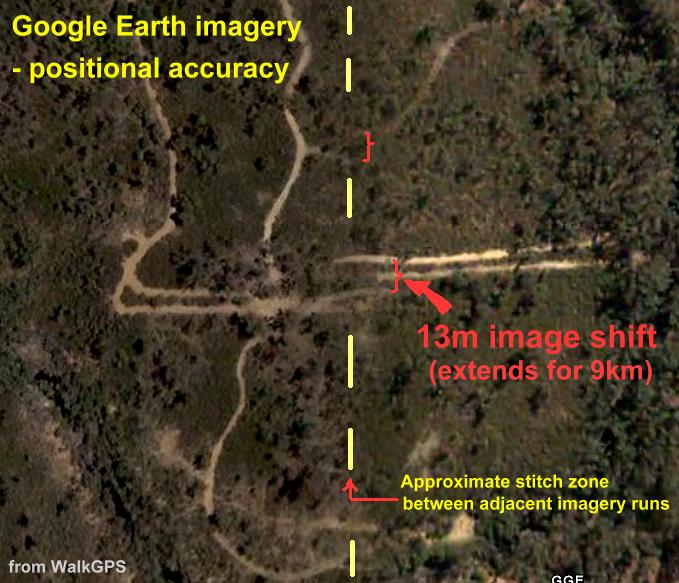
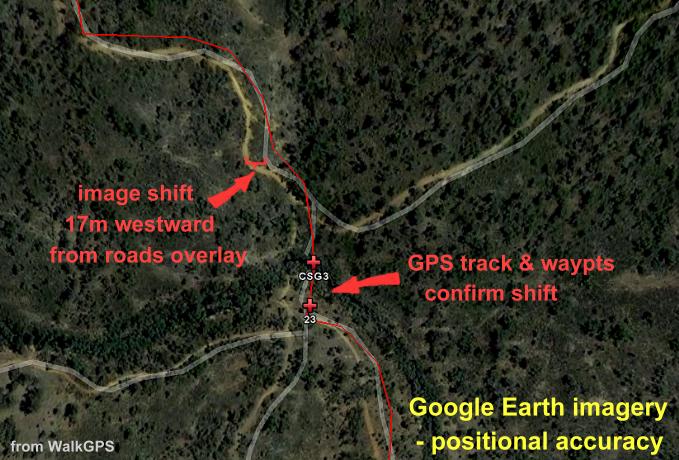
    Positional accuracy – Google Earth does not claim to provide positional accuracy of GIS or survey quality. Google Earth is very useful for picking ‘rough’ waypoints and routes, but don’t expect the data to have the same accuracy you would obtain from GPS field-derived data or accurate survey-quality maps. e.g. In the Perth region abrupt shifts of up to 13-16m occasionally occur along stitch lines between adjacent imagery runs and extend over several kilometres. Position shifts up to about 20m between the imagery and the roads overlay and GPS data (tracks and waypoints) are also common. If the apparent shift in the GPS data matches the shift in the road overlay, which is most often the case, you can measure that shift, then apply it as a correction to location coordinates read directly from the Google Earth imagery.

    Importing GPS data  –  Google Earth often has problems correctly opening GPX files. The most economical and fail-safe way to import GPS data into Google Earth is to first convert the data into  a Google Earth KML format (e.g. using GPS Visualiser) which can then be opened in Google Earth. KML files are available for all WalkGPS walk routes.

    Viewing a walk route in 3D – Opening a KML file in Google Earth enables exciting 3D display of satellite imagery terrains across walk areas. Import a kml file to ‘fly-in’ to a walk area and use the tilt and rotate capabilities to see the terrain from different perspectives. For enhanced 3D effect, set ‘Elevation Exaggeration’ in Google Earth to “3” (via ‘Tools’ menu, ‘Options’ & ‘View’ tab). In the ‘Layers’ panel: Ensure ‘Terrain’ box is selected. To view others’ photos from the area, select ‘Geographic Web’ box and click on the blue dots marking the photo locations.

    Google Earth imagery cannot be uploaded to your GPS unit, but both Garmin and Magellan market satellite imagery which can be uploaded and seamlessly integrated with other database maps.

    Creating waypoints and track in Google Earth – A set of waypoints and track (really a pseudo-track) for a new route can also be very easily created and exported from Google Earth via the following steps:

    1. Create a new folder in “My Places”; then,

    2. Locate Google Earth Placemarks and a Path on the imagery;

    3. Save the folder as a kmz (zipped kml) or kml file;

    4. Open the kml file in GPS mapping software or convert it to a GPX file (e.g. via GPS Visualiser) for direct upload to a GPS unit. The Google Earth Placemarks and Path become the Waypoints and Track in the GPX file. Be mindful that the Google Earth data is likely to be less accurate than the actual GPS data recorded on a walk.

  • Datum

    The walk maps on this site (WalkGPS) use a UTM position format (GDA94 datum) and a 1 km grid. Select the UTM (Universal Transverse Mercator) System in your GPS unit to determine your position rather than Latitude and Longitude. The UTM system (with its Easting and Northing grid coordinates in metres) is more practical for field use than using Lats. and Longs. (in Degrees, Minutes and Seconds or Decimal Degrees) and helps obtain more accurate location measurements off a map.

    If you wish to read off coordinates for locations from your GPS unit you will need to select the datum setting in your receiver to match the datum of your hard-copy map (e.g. GDA94 or WGS84 ). But be aware if you upload coordinates by cable from your PC to a GPS unit, they will always be uploaded assuming the datum is WGS84 (the standard GPS default datum).

    For practical purposes WG84 gives the same positions as GDA94 used on WalkGPS and no conversion is needed from GDA94 to WGS84, nor vice versa.

  • Before starting to walk

    It is important to leave your  GPS unit on for a few minutes at the start point of your walk and check it has acquired sufficient satellite signals to establish an accurate starting location. The receiver will then be able to maintain accurate location information during the walk. Even if you turn the unit off temporarily (e.g. at a rest point) it will be able to quickly and accurately find your current location (usually in 15-30 seconds). But if your unit fails to get that initial accurate starting position it may not give accurate location information during your walk.

  • New waypoints

    One of the great benefits of using GPS is the ability to accurately record the position of interesting features that you come across on your walk that you may want to be able to revisit in the future.  This is especially useful for locating small or subtle features that would have been very difficult to find again using traditional compass navigation.  When marking a feature as a new waypoint it may be useful to give it an appropriate short descriptive name (instead of a number) to help remember in the future what the feature was.

  • Cross-country walking

    When a route is ‘off-track’ (i.e. when it is cross-country, not along an existing track, ‘trail’, or ‘path’), the easiest walking between each pair of waypoints is seldom along the most direct line between the waypoints. When walking off-track, you need to be prepared to pick your own sensible route to the next waypoint by looking ahead and varying from the direct line to bypass local obstacles such as patches of thicker vegetation.

    Also see Cross-country Walking on this site.

  • Using GPX, KML and MAP files

    See Maps & GPS data for notes on how to upload files from WalkGPS on to your GPS unit or to import them to your GPS software or Google Earth.

    The GPX file is the only WalkGPS file suitable for directly uploading to your GPS unit.

    GPX files can also be opened in Google Earth, but KML files are more suitable than GPX for Google Earth use.

    MAP files can only be used in OziExplorer GPS mapping software, but if you open the saved MAP folder you can access and print the image file of the topographic base map covering the walk area. The waypoints, route and GPS track are each in separate files in the folder and are not displayed directly on the base map itself. The ‘clean’ map image can be useful for planning alternative walks in the area. Garmin users can also use the simple Garmin Custom Maps process to convert the WalkGPS map image into a file suitable for uploading to a Garmin GPS receiver (also see “Using your own maps” tab above).

    WalkGPS Disclaimer – Please read the Disclaimer before downloading or using any information from this WalkGPS website. All WalkGPS information is for your personal use only.

  • GPS 'track' files versus bushwalking tracks

    New GPS users may be confused by the use of the term ‘track’: In GPS terminology a ‘track’ means nothing more than a plot of a series of map points (not waypoints) which have each been recorded (logged) by a GPS receiver or have been opened from an uploaded ‘track’ file. A GPS ‘track’ does NOT have the same narrower meaning of a traditional walking ‘track’ (or trail). A GPS track may in fact be mostly or partly cross-country (i.e. ‘off-track’!) as in the case of many of the walks on WalkGPS (which are also provided as GPS ‘track’ files on WalkGPS Maps & GPS Data page).

    A GPS track is also not the same thing as a GPS route.  A ‘route’ is simply an ordered sequence of waypoints for a planned walk/journey. The GPX file for each WalkGPS walk includes both the track and route, along with the waypoints.

  • Batteries
    Battery life for a few Garmin units
    • entry-level Garmin eTrex SE (with two AA batteries (*)) –  up to 168 hours (or up to 1800 hrs in ‘Expedition’ mode)
    • eTrex 32X (with two AA batteries (*)) –  up to 25 hours
    • eTrex Touch (with rechargeable internal battery) –  up to 130 hours (or up to 650 hrs in ‘Expedition’ mode)
    • eTrex Solar (with rechargeable internal battery) –  up to 200 hours (or up to 1800 hrs in ‘Expedition’ mode; unlimited with solar charging in suitable conditions)

    (*) Use rechargeable AA batteries.

    Extend battery life
    GPS handheld users
    • Turn off tracking during long stops
    • Minimise screen brightness
    • Consider switching satellite tracking to ‘GPS Only’ (ie switch off GLONASS/Galileo etc) if highest accuracy not required
    • Consider reducing the track recording interval
    • Keep phone warm if in cold environment
    • Carry spare batteries or portable power pack (depending on battery type)
    Smartphone app users
    • Turn on airplane mode
    • Download offline maps before leaving home, or use a map database stored on your phone
    • Close all non-navigation apps
    • Minimise screen brightness
    • Keep phone warm if in cold environment
    • Carry a portable power pack
  • How much data will my GPS unit hold?

    Modern GPS units can hold large quantities of data:  See information for Garmin units including fenix wearable (as of 2016).

    For example Garmin’s eTrex 20/30 units will hold 2000 wayoints, 200 routes with up to 250 waypoints per route, 200 saved tracks, 10,000 points per track, 100 custom maps.

  • Lanyard, carabiner or chest mount

    Always keep your GPS unit securely looped onto your belt or clothing by a lanyard or carabiner. The hand-held units are small and very easy to leave behind at a rest stop unless attached to you!

    If using a smartphone for navigation, consider investing in a phone harness or chest mount to protect your phone from damage from weather and knocks and also to provide hands-free access.

  • Global positioning systems

    If your GPS unit has the capability of accessing multiple global positioning systems systems in addition to the U.S.’s GPS system you should check that it is activated in your receiver settings.

    Up until 2011, GPS receivers relied solely on the U.S. Global Positioning System (GPS) for position fixing. The Russian Global Navigation Satellite System (GLONASS) achieved full global coverage that year enabling  GPS receivers (and smartphones) with access to GLONASS to then connect to many more satellites, and to fix positions more quickly and accurately, potentially down to 2m.

    Europe’s Galileo system,  China’s ‘Beidou system and Japan’s Quasi-Zenith Satellite System (QZSS) came into global service around 2018-2020, further improving the positioning accuracy achievable by handheld GPS receivers and smartphones with access to all systems. eg Garmin’s entry level eTrex 10 unit could only lock onto GPS & Glonass satellites whereas its replacement, the eTrex SE device, can lock onto all five satellite systems: GPS, GLONASS, Galileo, BeiDou & QZSS. This can give a much quicker and more accurate position fix especially in more challenging environments.

  • Useful links

    If you haven’t used GPS navigation before, you will find that getting started is easy. The ‘quick start’ manual that comes with your GPS unit may be very basic but you can access additional information online and elsewhere.

Back to top